I’m not sure if I should feel good or bad about this post. I mean, as I started thinking about writing it, I was feeling great, but then I dug back to see what I’ve posted before, and it appears that I last posted on organizing the collection back in January. And I look at that picture and I chuckled to myself and thought “amateur.”
Huh.
I did make a post about how much new stuff I’ve picked up and how big the collection has become, and I even included a snapshot of the collection. And even that is somewhat laughable.
So I’ve come a long way, and a recent request for pictures of our “blade stash” in the Wicked Edge subreddit just triggered something in me. Plus is was cool to see the wide variety of what people have out there for shaving.
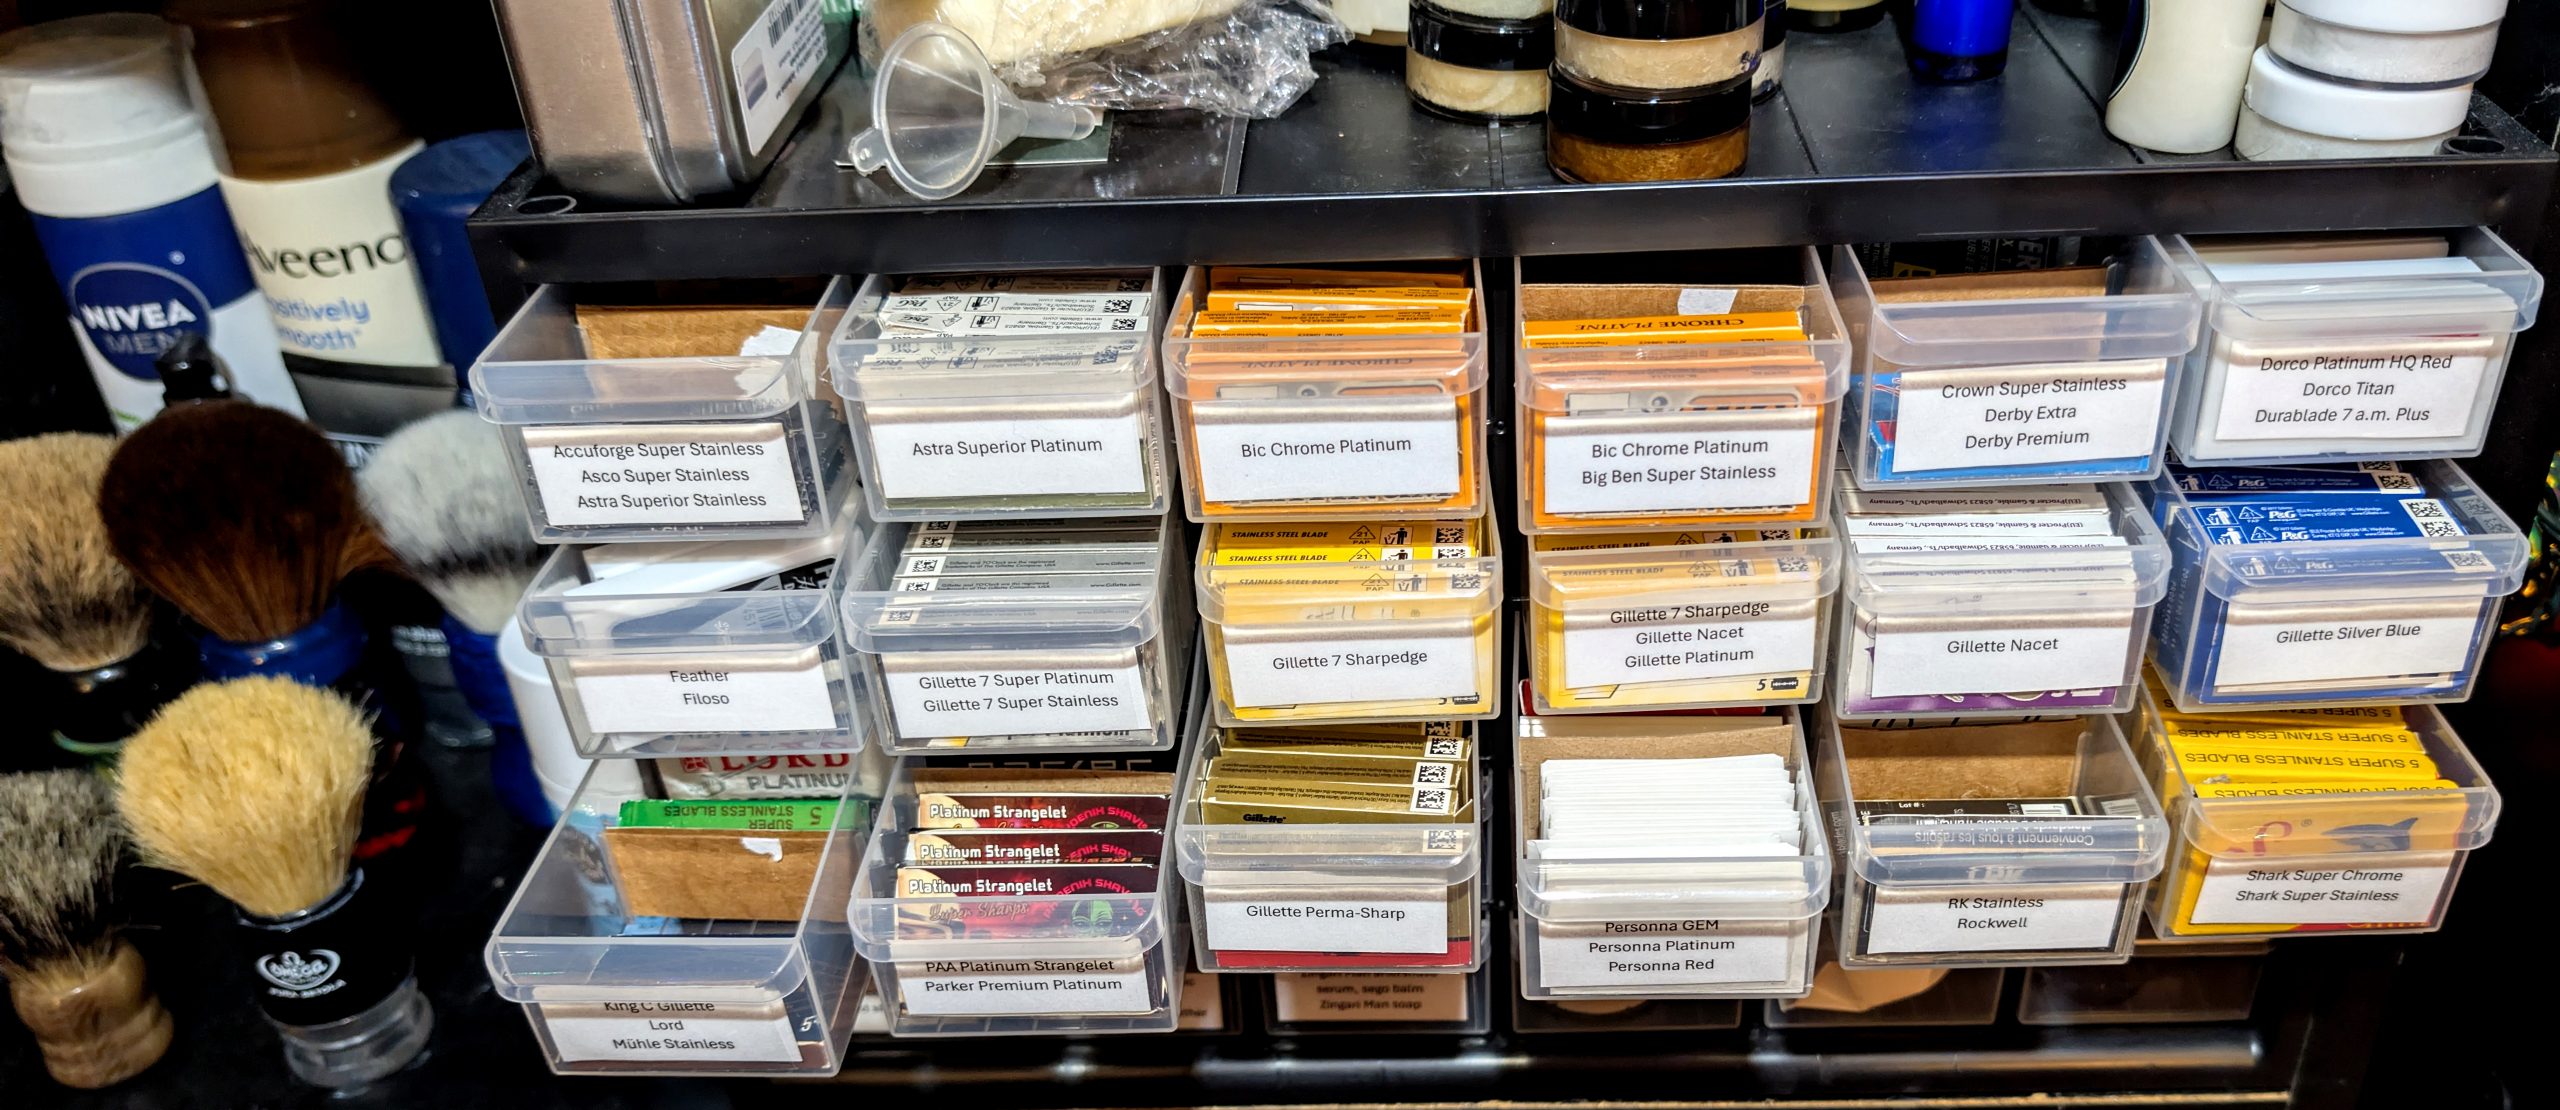
Here’s the current blade stash, all 988 blades, 194 tucks, and 46 brands worth:
Once I hit a point where I had maybe 50-75 tucks of blades, the problem became how to store them. No, they don’t really take up a lot of space, but keeping them organized and in one place can be a challenge. And the key word here was organized. There’s something about my blade collection where I need to keep it organized and sorted. So that’s been the desire and challenge. I used a Harbor Freight small parts sorter for a while, a box with a locking lid and nine individual compartments that were of a size to make blade storage work. That solution was fine for a while, but I outgrew it. And keeping rows of tucks in a box or something was not to my liking. So I went on a quest.
Well, in the internet age, the quest is more metaphorical than anything else, but you know what I mean. Most tucks are one of two sizes: cardboard box of about 1 7/8″ x 1″, or plastic case that’s about 2″ x 1 1/8″. Armed with that knowledge, I started hunting for some sort of storage that had individual trays, drawers, slots, or whatever that could accommodate that size.
Now, it should be noted that my adult son collects Legos and has an Instagram account where he makes minifigs of sci-fi, comic book, superhero, and other characters using existing parts. And he stores all of those minifig parts in a small parts organizer. That became the focus of my search. An organizer with drawers that were just under 2″ wide, over 1″ tall, and wasn’t a huge thing that itself would be difficult to find space for.
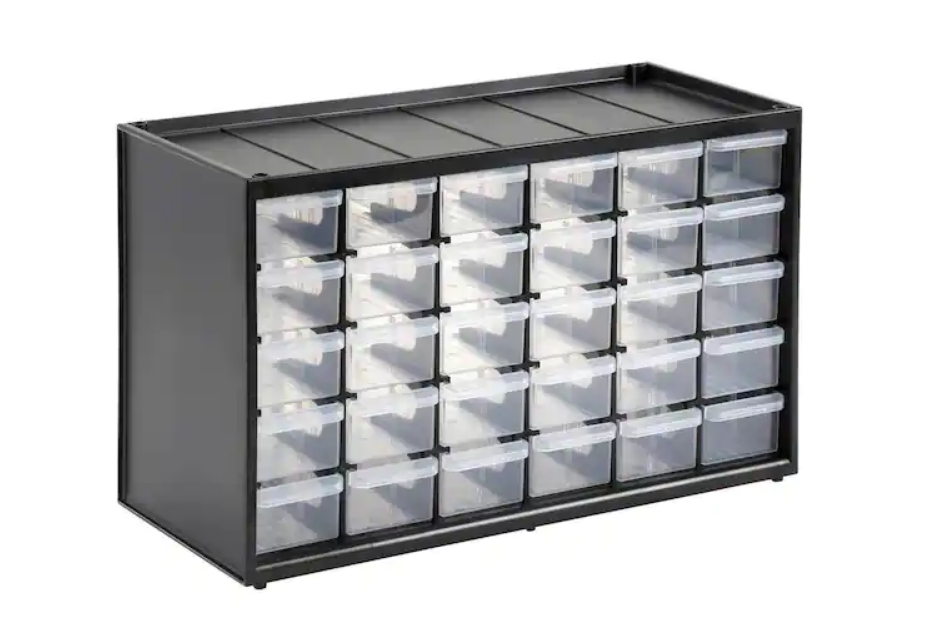
Bingo. Home Depot. Done.
Spent some time with my wife organizing and sorting and labelling the drawers, and I was set. Some of the plastic tucks are just slightly too wide to fit across the box, but they can be slanted or oriented the long way in the box. It works.
But the labels here are the big key. In an instant, I can find what I’m looking for. It’s alphabetized so I can easily find the right drawer, and with only 2-4 different brands in a drawer, it’s pretty efficient at organization.
Since then, the collection has grown. And grown again.
I relabeled at one point, sure it wasn’t going to grow much more.
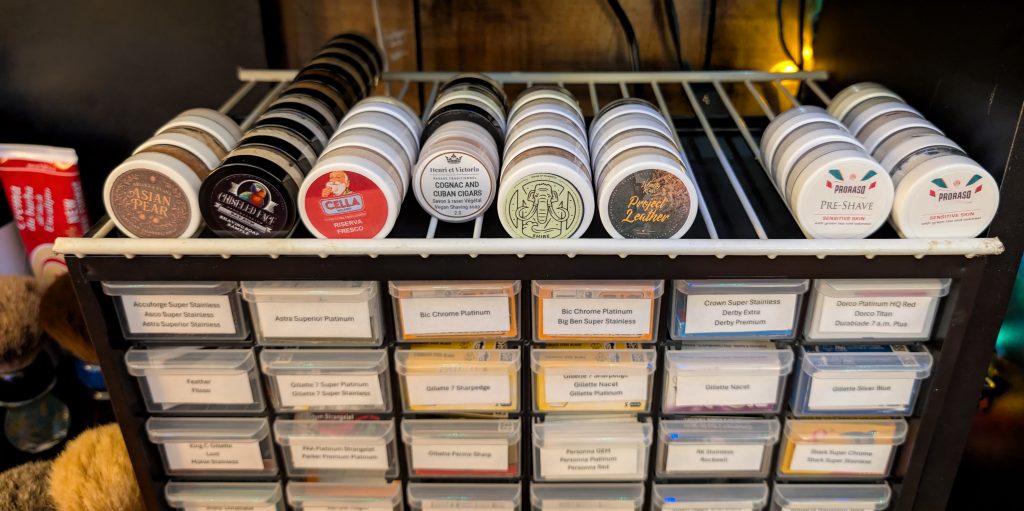
But it did, so I have relabeled the drawers again, ordering Avery 1 3/4″ x 3/4″ rectangular printer labels to make it easier in the future. As an aside, I also bought some 1 1/4″ round labels to create my own labels for the sample/travel tubs. I’ll show those off later.
And in the meantime, along came this call for pictures of the blade stash. I sent a picture of mine, and the response was really surprising to me.
Surprising because my collection, at 988 blades, is large, no doubt. But there are a lot of people who have several hundred blades, and some have a thousand or more because they love one or two blades and buy enough in one go to last them for a decade or more. These collections get stored in cigar boxes, shoe boxes, plastic bins in closets or under beds, in drawers, trays, etc. But it seems like no one has thought to get a small parts storage bin and toss them in there. People seemed impressed with the organization, and how everything fit so neatly.
So, it should be noted that I got the idea both from my adult son’s Lego minifig part collection along with seeing a few people use a Harbor Freight mini tool box for their razors. Hardware storage feels like a good option for this stuff. But also, my son should be commended here, because while online comments about the tray system note that drawer dividers can be hard to come by, he noted that the bin is sold by at least one other brand name (ArtBin) and that brand does offer dividers. I had fashioned some from cardboard, but I’ve ordered the correct plastic replacements, and they’re on the way.
Anyway, there are empty drawers in the storage bin, and for a while I’ve had some of the sample lathers and such in there. But this wasn’t optimal–the tubs are too big to sit on edge in the drawers, and they also don’t fit if stacked, so really, I could only put 3 sample tubs in one drawer. It feels like a waste of space and very inefficient.
For a while, I’ve had an idea to buy/make/divine a storage unit for them that is similar to a coin sorter/storage tray. You know, the ones banks use to store rolls of coins? The tubs are 1.5″ in diameter generally (and .75″ tall), so the channel or column or whatever needs to fit that diameter. And that’s bigger than even the 50 cent piece, which is just under 1.25″. So that won’t work.
I’ve thought about using PVC pipe or something similar, cut out a 1/2″ slit down the length of it, and slide them into the pipe. A bottom flange and slot would allow me to pull out a tub. But this doesn’t keep them organized. Just contained. I’d basically have to go through the whole stack to find the one sample I wanted for a shave. So that was a non-starter.
The love shown for the blade storage had my mind really racing with thoughts on how to better store my sample tubsIn thinking about this challenge, I realized I could at least create a temporary idea that might work. So, high on that love, I took an angle grinder to a wire shelf. And here’s what I ended up with:
9 rows (Columns? Channels?) in about 13.5 inches across. And at about 8.5 inches deep, there’s enough room to hold at least 10 tubs.
Bonus: the supports that were on the underside of the shelf are now on top, acting as a natural stop for the rows/columns/channels, keeping the contents reasonably secure.
Okay, that works. And it proves that there’s plenty of capacity in that form factor. But it isn’t pretty enough, and looks far too temporary. Now, what could supplant that that would (a) look better, (b) perhaps offer a front lip for quick reference, and (c) perhaps offer sides to each channel to securely hold the tubs?
Again, the coin roll tray won’t work. Too small. What’s something slightly larger that would require the use of trays?
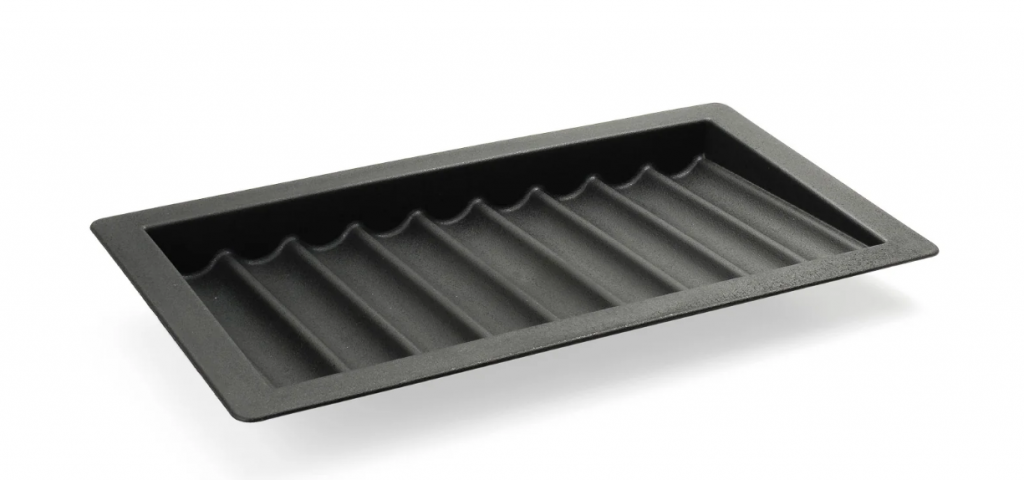
Then it hit me: poker chips. After some research, I found that standard poker chips are 39mm in diameter (there are larger ones at 43mm). 39mm is just barely over 1.5″. So there it is: poker chip trays.
An evening of Googling and shopping ensued and the results were positive and disappointing all at the same time. Because poker chips are part and parcel of the whole gambling game, there are things that casinos want that have become standards. And these standards, while, erm, standard for gambling, pose a couple issues for my use case.
Case in point #1:
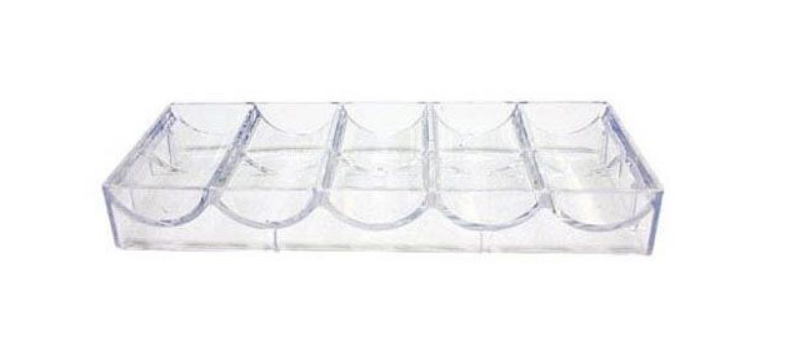
The standard casino tray given to gamblers who like to play the chip-employing games of chance. It’s acrylic, so it simultaneously is cool looking–“ooh, clear!”–and transparent for ease of security observation.
In addition, it’s a consistent size of 5 channels by 20 chips per channel (about 3″, give or take). This allows for a quick and easy drop of 20 chips in each channel, which will amount to a nice easy denomination and count (20-$5 chips is $100. 20-$10 chips is $200, etc.), thus saving time for the chip counting staff. This would work for what I need, but the inner channel size is almost certainly not 3″, and while the tubs are generally 3/4″, which would add up nicely to 4 tubs for each channel if they did have a 3″ inner length, falls short for any smaller inner length.
The size of these trays puts their capacity at 15-20 (20’s a long shot) tubs. I’ve got 43 at the moment (a number that shouldn’t fluctuate a lot in either direction because as I use them, I’ll repurpose them, and don’t really think I’ll get very many more. So I’d need 3 such trays, and by that point, the space required easily overwhelms the top of the blade storage box.
So this feels inadequate.
Case in point #2:
The dealer chip tray. A tray made to be sunk into an opening cut into the poker or blackjack table. That explains the flanges on each side, to keep it from falling straight through with all of that sweet, sweet, pretend money that lets you gamble without actually realizing how much money you’re actually gambling away.
The sizing is okay, but something I’ve discovered with this design is first that that flange adds 1.5″ or so to each dimension. So a 9 channel tray clocks in at 15 or more inches wide. I don’t necessarily mind it hanging over the edge of the small parts organizer, but there is a point where it just looks mismatched.
The second problem is that it’s plastic, which I’d like to avoid, but may be unavoidable. And the bonus problem is that I never considered that the ridge between each channel would take up space and make a 9 channel wide tray (without the flanges) to be wider than 13.5″.
This is the obvious front-runner at the moment, as it’s frankly the better looking and more practical solution of the two. But I don’t love it.
Case in point #3:
Make some modifications to a chip carrying case. You know, the metal cases with the chip channels in them? Except that I don’t really want to close it, and I don’t really want the wasted space of trays for a deck or two of cards, dice, etc.
Again, not optimal.
So the shopping will continue. In other news, I now know where to go if I ever find myself starting up and equipping a casino. Holy smokes, there are things being sold online that I never thought about.
The legless rack will continue to serve its function for the foreseeable future. And I have tested and carried it around briefly, and it does hold things with some degree of security. But a quick turn would have the tubs rolling off into the distance. So this is definitely a short-term fix.
As one does when one is on a roll with organizing, though, I took a broader view of the rest of the collection, and decided that it too needed some sorting.
At one point, I repurposed a spare stepped spice rack to help allow lathers and other products to be seen over things in front. And things have been roughly laid out there–mostly lathers, but the tube-based creams were off to the side along with a stack of some of the larger tubs of soap, and the pre- and after shaves have been scattered in there as well, mainly because I like (and still kind of do) displaying the brands together. But do I need an entire shelf of the stepped spice rack dedicated to Cella Milano? No, I do not.
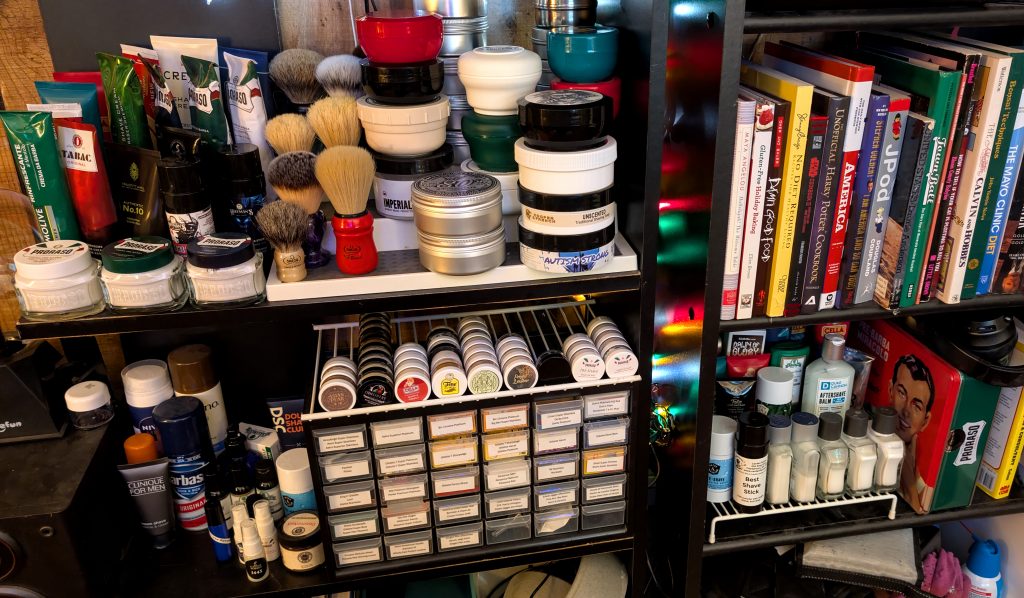
Let me note that at this time, a full 2 1/2 shelves in my den are dedicated to shaving stuff. It wasn’t that long ago that I had it all packed into one shelf…and some additional space in the bathroom. But now only the beard care items and razors along with their things in the mini tool chest are kept in the bathroom full-time.
One entire shelf is now devoted to just lathers. Well, mostly. Soaps, creams, gels, sticks, and what-have-you are occupying the center shelf and make up a great display. Soaps mostly occupy the stepped rack, with the brushes filling out the rest.
Pre- and after shaves occupy another stepped rack that I found in storage here, and honestly, they barely fit.
Some of the canned foam, resupply stock, and other miscellaneous items occupy the remaining third of the shelf with the blades and samples.
It’s set for now, but as you can tell, there’s always room for improvement, and there always seems to be change, even when I’m not planning on it.